
56 Easey Street
Collingwood, 3066
Victoria, Australia
Mon - Fri 8:30am - 4:30pm
Creating Complex Imaging Solutions +613 9419 5247
Guide to digital infrared (IR) photography

Imaging by Design is Camera Clinic's sister company 1300 72 10 70
Located at 56A Easey Street Collingwood.
Infrared modifications


720 NM Images
Introduction
Conventional (visible light) photography is the formation of images with light at wavelengths from 380nm to 750nm.
Infrared (IR), or more correctly known as near infrared (NIR), photography is the formation of images with humanly-invisible light at wavelengths from 750nm and above. Most IR photography involves wavelengths up to 1200nm. IR photography is done with a very dark (opaque-looking) IR-passing filter which could be made of glass or plastic.
Generally, there are 2 broad methods to produce IR images with digital cameras. First, the attachment of an IR-pass filter over the lens. Second, the attachment of an IR-pass filter replacing the imager (CCD/CMOS sensor) pass filter.
Full Spectrum modifications: Ultraviolet Modifications
Quick link to order form Quick link to pricing
Starting Infrared photography with a dedicated digital camera
Advantages of a dedicated (IR-modified) digital camera
|
Increased transmission of infrared light on to the imager results in faster exposures and lowered ISO.
|
|
Fast exposure allows handheld photography and freezing of moving subjects. Fast exposures are also less susceptible to electronic noise.
|
|
Lowered ISO images are less vulnerable to electronic noise, hence resulting in smoother and higher definition images.
|
|
With a DSLR camera, composition and focus is possible through the viewfinder. There is no black-out due to an IR filter attached over the lens.
|
|
With only an IR-pass filter fitted, visible light is eliminated in the captured images; hence optical interference from visible light is absent. This can result in sharper (properly focused IR light) and stronger contrast images.
|
|
IR-modified cameras can be, and should be, focus calibrated for the IR spectrum since IR does not focus on the same focal point as visible light. Even in the visible light spectrum, red and blue do not focus on the same focal point.
|
| If the digital camera was modified properly with focus calibrated for IR, there is no need to manually compensate the focus. (Only the lenses within the calibrated range) |
Colours & white balance
Using Auto White Balance (AWB), some digital cameras may produce IR images with a strong yellowish/reddish/brownish colour cast known as false colour. This is due to the characteristics of the imager and processing algorithms. Post-processing in Adobe Photoshop (or similar) is required to remove/reduce this false colour effect. False colour can be removed/reduced by shooting images with Custom White Balance.
Using Custom White Balance (CWB) measured on sun-illuminated grass/leaves (a ubiquitous available midtone), IR images tend to appear more monochromatic.
When using the Colour mode, random spots of colour (colour artifacts) may occur in images. If the camera has Black-and-White mode, using this mode will eliminate colour artifacts, and may strengthen the monochromatic appearance in IR images.
Generally, there are 4 possible combinations of photographic modes to shoot infrared images.
Colour mode with AWB
Colour mode with CWB
B&W mode with AWB (unavailable on some cameras)
B&W mode with CWB (unavailable on some cameras)
More false colours can happen with other white balance settings such as Tungsten or Fluorescent.
Post-processing of Infrared images
1. Open your IR images in Adobe Photoshop. Click Image > Adjustments > Auto Contrast if your images are underexposed due to the filter.
2. Click Image > Adjustments > Channel Mixer. Select Red Channel in Channel Mixer, slide your Red percentage to 0% and Blue to 100%. Now select Blue Channel in Channel Mixer, slide your Blue percentage to 0% and Red to 100%. The basic process is done.
3. You can still further tweak the colours to your desired effect.
4. To enhance whites/highlights:
Click Image > Adjustments > Selective Colour. Select Neutrals. Slide the Black to a negative percentage to enhance whites/highlights. Experiment with the Method - Relative or Absolute.
5. To obtain a cyan-tint:
Click Image > Adjustments > Selective Colour. Select Black. Slide the Yellow to a positive percentage.
6. To obtain a yellow-tint:
Click Image > Adjustments > Selective Colour. Select Black. Slide the Cyan to a positive percentage.
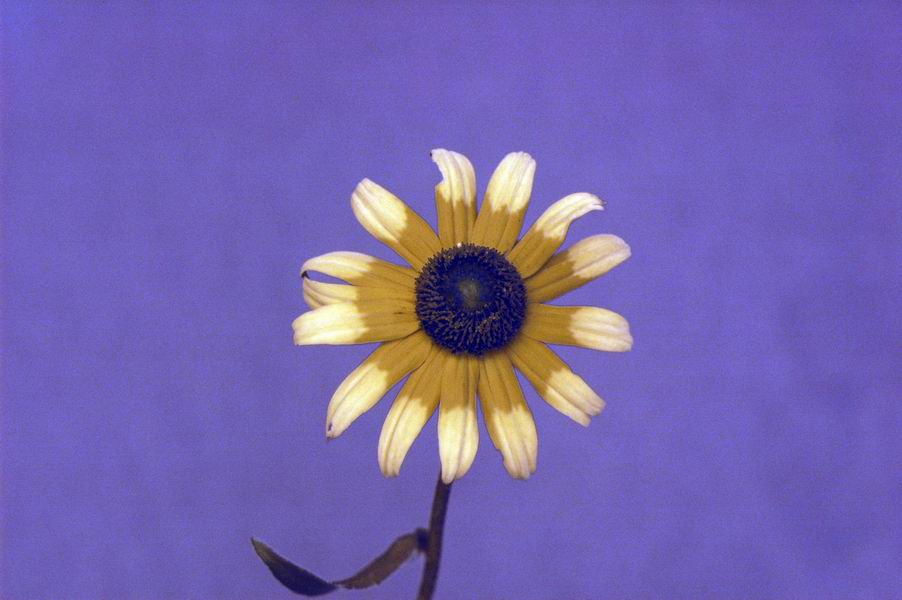
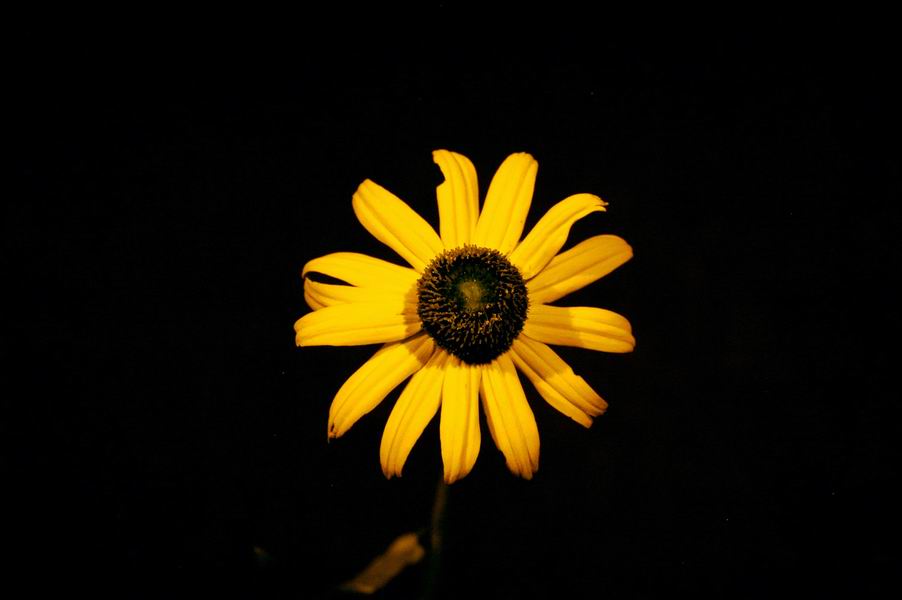
The key to awesome Infrared images


Camera that maintain blue in a custom white balance mode. (Seen in image below)


Pricing effective 1st May 2020
Wavelength sensitivity depends on the camera, typically:
Camera with out any modification 400nm to 750nm
Camera with full spectrum modification 280nm to 1100nm
Camera with IR only modification 700nm and above.
| Compacts | $295.00 |
| Mirrorless unit | $395.00 |
| Consumer SLR | $495.00 |
| Full frame SLR and Full Frame Mirorless | $595.00 |
Most cameras can be converted. The price includes a filter of your choice, fitting, calibration and focal adjustment to a lens and focal specification you choose.
Our qualified technicians will dismantle your camera in a clean booth and replace the band pass filter to the spectral response of choice the Auto focus and Auto exposure system is adjusted to match this response. Your camera is cleaned reassembled and tested.
A focal calibration will be carried out on your lens to allow your camera to auto focus to a certain point. To focus past that point you will have to manually focus.
The camera will have the metering adjusted accordingly.
To have your camera modify and enjoy the new would of near IR; print and complete the form below send a copy with your digital camera to Camera Clinic
Please call 1300 72 10 70 or
Print and complete this form (IR Form PDF IR Form Word ) send it with your digital camera
Available filters and Infrared film stock comparisons
Most common filter used in SLR conversions is the Wratten 87 this gives best performance for digital cameras.

Full Spectrum (Clear Filter) options
Full Spectrum (Clear Filter) options for those interested in the UV, Visible and IR spectrums. The prices for these filter options, including installation service, are the same as the pricing table above. We can also special order most filter variation that you may need. Some of our customers have ordered special filters covering narrow or wide areas of the spectrum for specialty photography, including Astrophotography, Solar photography, Fireworks photography and others. Also, we are constantly testing conversions on models that are not listed below. If you are interested in having a camera model converted that is not listed above please contact us as we may be able to accommodate your needs.
Light spectral range, most full spectrum converted D-SLR cameras are sensitive from 250nm to 1100nm
Ultraviolet Spectrum Modifications
Now available UV sensitive camera modifications using the Baader UV filter or the Schott UG11filter available for most DSLR cameras or compacts. pricing same as IR.


Wavelength comparison table
Firmware
What is firmware and how do I use it?
The firmware is a set of operating instructions your camera requires to perform any of its functions. It resides in the EPROM (Erasable Programmable Read Only Memory) or CPU (Central Processing Unit) on the main circuit in your camera. Mobile phones, DVD players and many other electronic equipment use a firmware instruction set.
A firmware file is unique to each model type and can be updated by uploading a more recent version.
Why would I update the firmware?
Improvements, most camera manufacturers rewrite the firmware to eliminate faults or improve colour and communication to computers and memory cards, some will include new features or change the menu language. These updated versions are available from the Manufactures web-page.
Not all cameras have firmware updates available. Those that do require close attention to the accompanying instructions.
There are two methods used to upload firmware, one: connect the camera to a computer via a USB and run the executable firmware file Two: copy the firmware.bin file to a memory card, insert the card in camera and follow instructions.
You can visit the service and Manufactures Support and Support section on their web-site, you will also find more information on changes relating to you camera.
If you are still unsure call the nearest Manufactures Authorised Service Centre they can do it for you. Check in the camera menu for the firmware version (check the instruction manual each unit is different). You may find you already have the latest firmware.

All digital cameras have a calendar clock in-built. This generates the time and date that is embedded in every image at capture. In order not to reset this clock power must be maintained at all times to the circuit.
When you remove main batteries a back up battery or capacitor takes over power supply to the clock. Backup power can last 3 minuets to 3 weeks depending on your model. If your backup battery or capacitor is faulty expect about 30 seconds before reset, this part is replaceable however it is internal and can only be done at a qualified service center.
Where convenient use the AC power adaptor when changing batteries this way it won’t reset.
As a general rule internal Batteries and capacitors drop there capacity to hold charge by 12% every 12 months

Camera Clinic's sister company 1300 72 10 70.
Designing and manufacturing cameras for client’s individual and specific photographic needs.
Examples of some of these units for a select and diverse range of industries.
| Zoos | Night imagery used for Zoos & Wild Life Sanctuaries. |
| Recording animals behavioural patterns targeting breeding programs | |
| Medical Imagery |
Ophthalmology units for eye testing
|
|
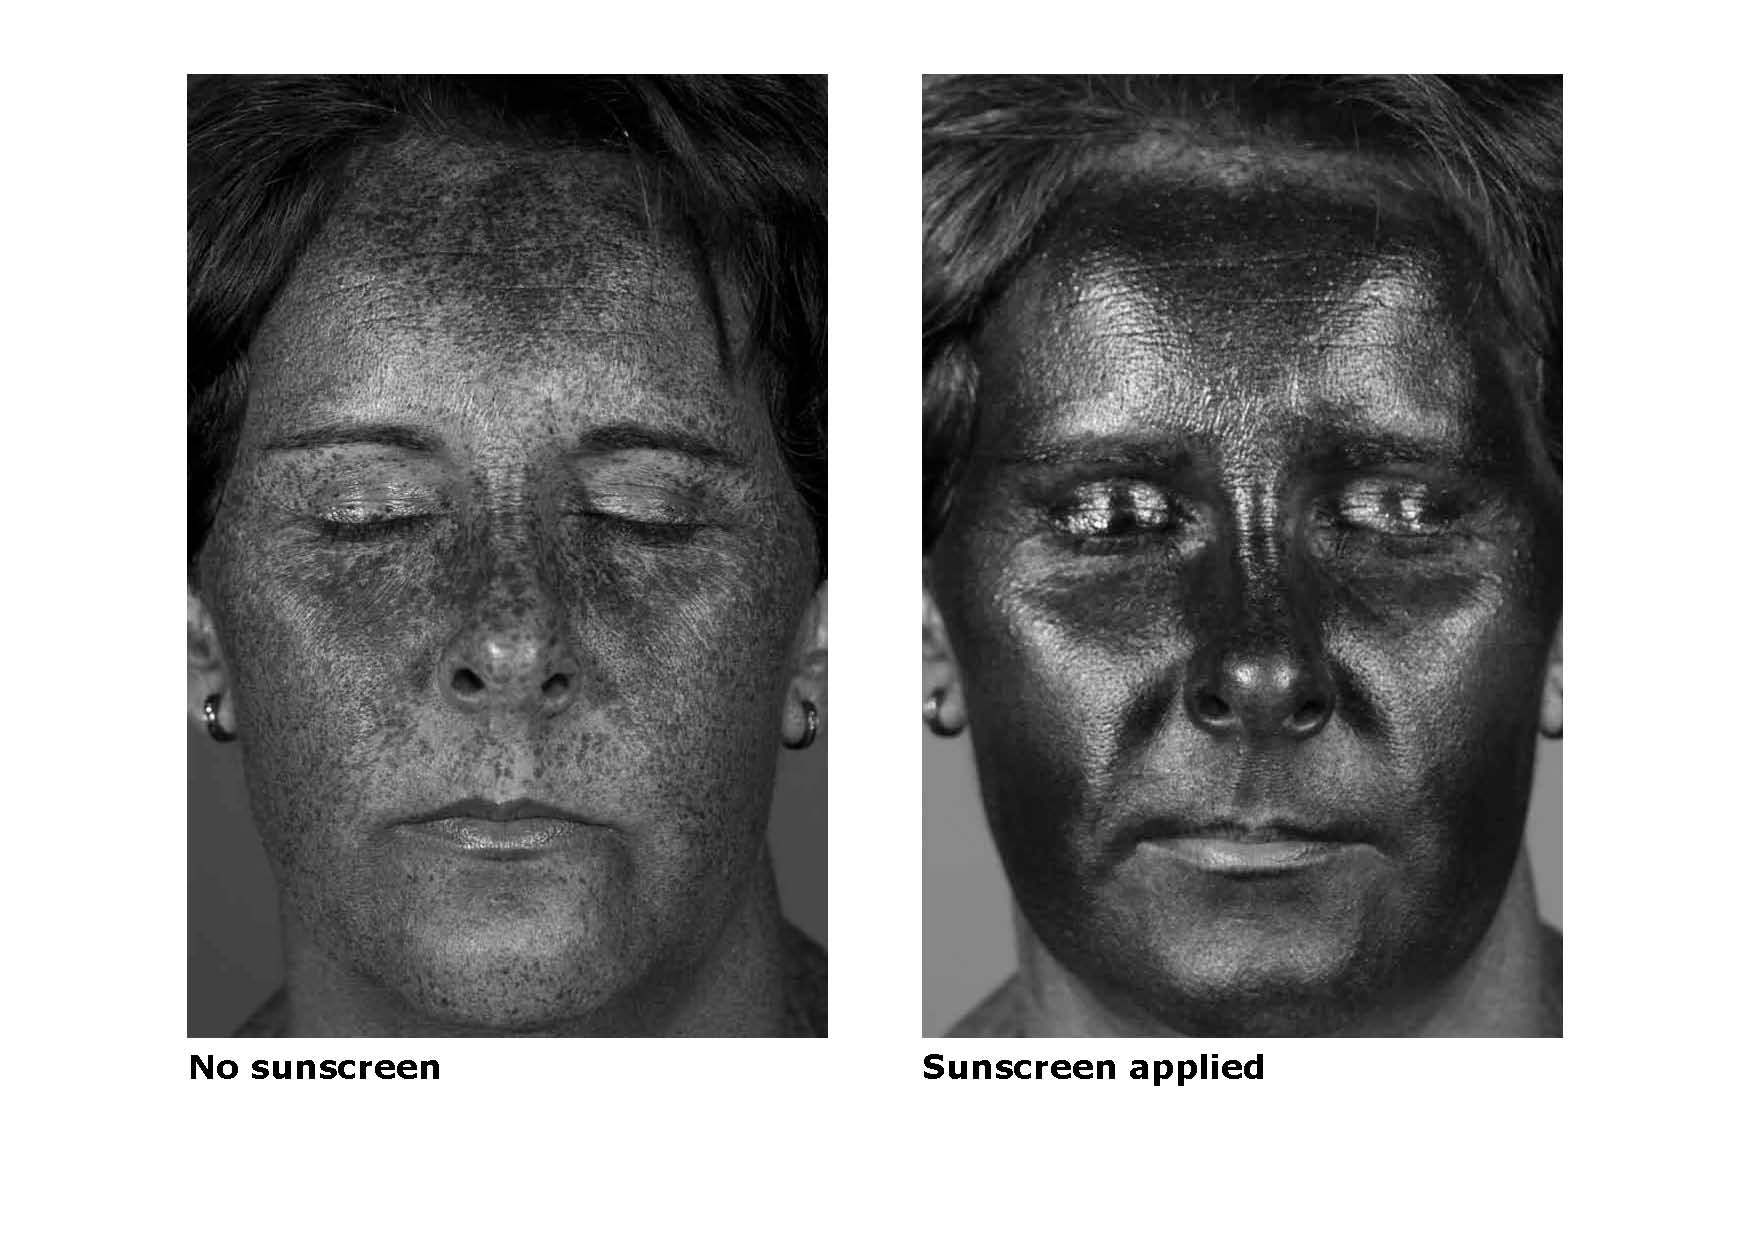
Skin cancer and mole mapping – Ultraviolet photography
|
|
|
Dental records/file keeping
|
|
|
Cosmetic Surgery procedures (before/after)
|
|
| Time Lapse |
Theme Park cameras; capturing images on theme park rides
|
|
King Pin bowling - Melbourne
|
|
|
The Edge Sky Deck Eureka Tower– Melbourne
|
|
|
Chill Bar – Melbourne
|
|
|
King Kong – Sky Deck Melbourne
|
|
|
Bungee Swing – Queensland
|
|
|
Boomerang Park – Queensland
|
|
|
Architectural time lapse; capturing images of building projects
|
|
|
Botany – capturing rare species of flora in bloom
|
|
| Aircraft | Producing custom made camera housings to accommodate photographic |
| units to fit particular aircraft wings to assist with photographing bush fire zones. | |
| Electricity companies checking power lines and geographical surveys | |
| Aerial photography | |
| 3 Dimensional |
Cameras designed to sync together; producing 3 dimensional images.
|
|
These units are in high demand in the mining industry.
|
|
|
Also used for mapping, engineering and surveying.
|
|
|
Police department; crime scenes.
|
|
|
3D camera rigs bracketed to a transportable apparatus; recording images
|
|
|
of horse’s hooves, for farriers to purpose make horse shoes for the
|
|
| horse racing industry | |
|
Hi Speed Sync
|
Modifying cameras to capture hi speed imagery; popular in advertising
|
|
|
eg: Capturing split second water droplets or a balloon popping.
|
|
|
|
|
Remote Release
|
Extension of a remote release.
|
|
|
Modifications to remote release units.
|
Quote fee is $49.50 one piece of equipment
Combination special: Camera and lens (only) the quote fee will be split between the two units. Each unit will be $24.75. The quote fee comes off the cost of the repair.
Additional piece of equipment is $49.50.
We do not quote under $150.00 per item. If the repair cost is under $150.00 the repair will be carried out and the quote fee will come off the cost of the repair. Film units are the exception.